MAAF NC CREATIVE DESIGN MASIH DALAM PERBAIKAN

we expect you to be patient for the inconvenience thanks.This theme is Bloggerized by jayus ernanta - Premiumbloggertemplates.http://jayusgokil.blogspot.com.

MAAF NC CREATIVE DESIGN MASIH DALAM PERBAIKAN

we expect you to be patient for the inconvenience thanks.This theme is Bloggerized by jayus ernanta - Premiumbloggertemplates.http://jayusgokil.blogspot.com.

MAAF NC CREATIVE DESIGN MASIH DALAM PERBAIKAN

we expect you to be patient for the inconvenience thanks.This theme is Bloggerized by jayus ernanta - Premiumbloggertemplates.http://jayusgokil.blogspot.com.

MAAF NC CREATIVE DESIGN MASIH DALAM PERBAIKAN

we expect you to be patient for the inconvenience thanks.This theme is Bloggerized by jayus ernanta - Premiumbloggertemplates.http://jayusgokil.blogspot.com.

MAAF NC CREATIVE DESIGN MASIH DALAM PERBAIKAN

we expect you to be patient for the inconvenience thanks.This theme is Bloggerized by jayus ernanta - Premiumbloggertemplates.http://jayusgokil.blogspot.com.

Mar 25, 2014

SENJATA TAK HABIS HABIS RESIDENT EVIL 4

SENJATA TAK HABIS HABIS RESIDENT EVIL 4


hai sobat GAMERS.. pasti tidak asing lagi dengan game yang satu ini... buat pemula pasti sangatlah sulit,,, nah di sini saya akan membantu cara cepat bermain resident evil 4...di sini saya mempunya file save data profesional yang sudah tamat " silahkan tertawa dan jungkir balik hehehe" tidak perlu panjang lebar saya jelaskan silahkan file nya di download di akhir postingan..
o iya ini hanya untuk PS 2 MATRIK dan mengunakan Free McBoot
pertama :
setelah kamu
download filenya extrak file nya dan copy semua polder BESLES-53702DATA14
di plasdis kamu..
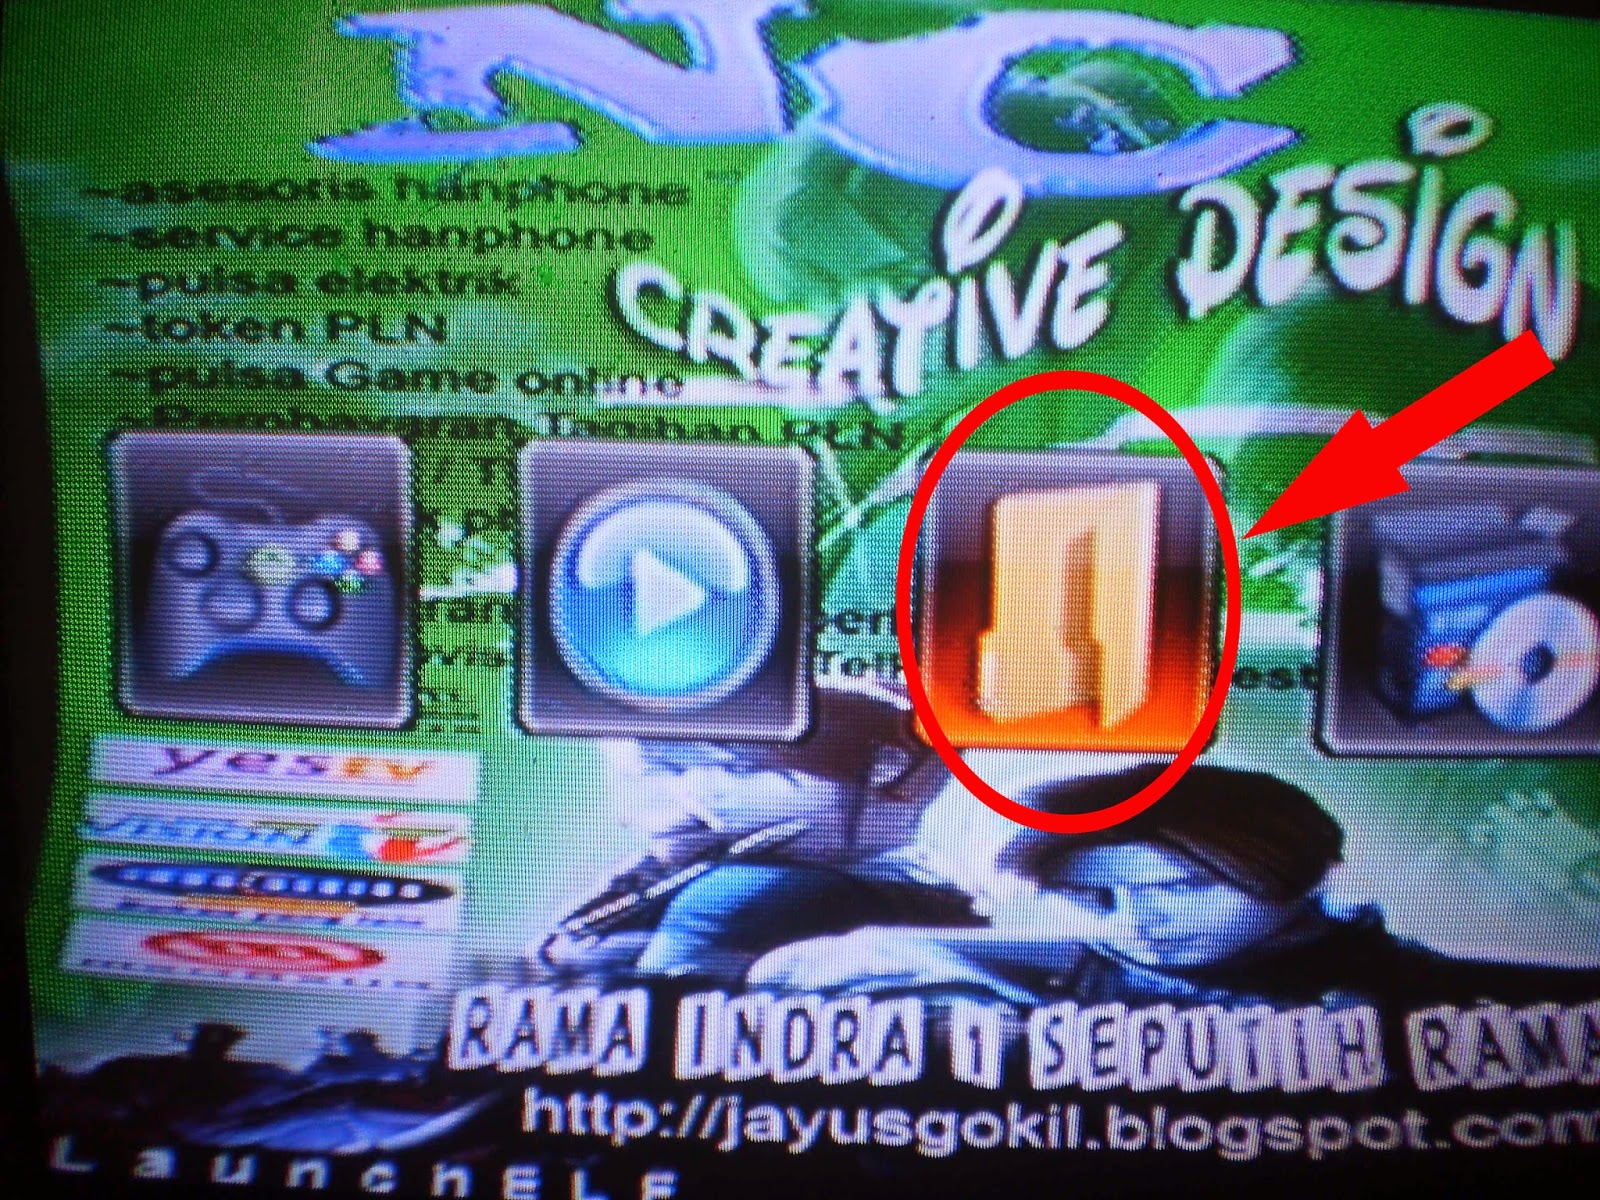
hidupkan PS kamu sebelum loading ,bila PS kamu MATRIK tekan x pada menu uaunchelf gambar di bawah ini.
NB. plasdis kamu tidak akan bisa ngloding data uaunchelf tanpa HDD ,tenang saja tinggal copy aja master datanya di HDD kamu nama datanya"OPL,system,THM,VMC" ke plasdis kamu,, bila bingung silahkan dowloan di akhir postingan. :d


bila PS kamu menggunakan Free McBoot"OPL" langsung aja tekan R1
setelah itu akan masuk ke menu berikut..


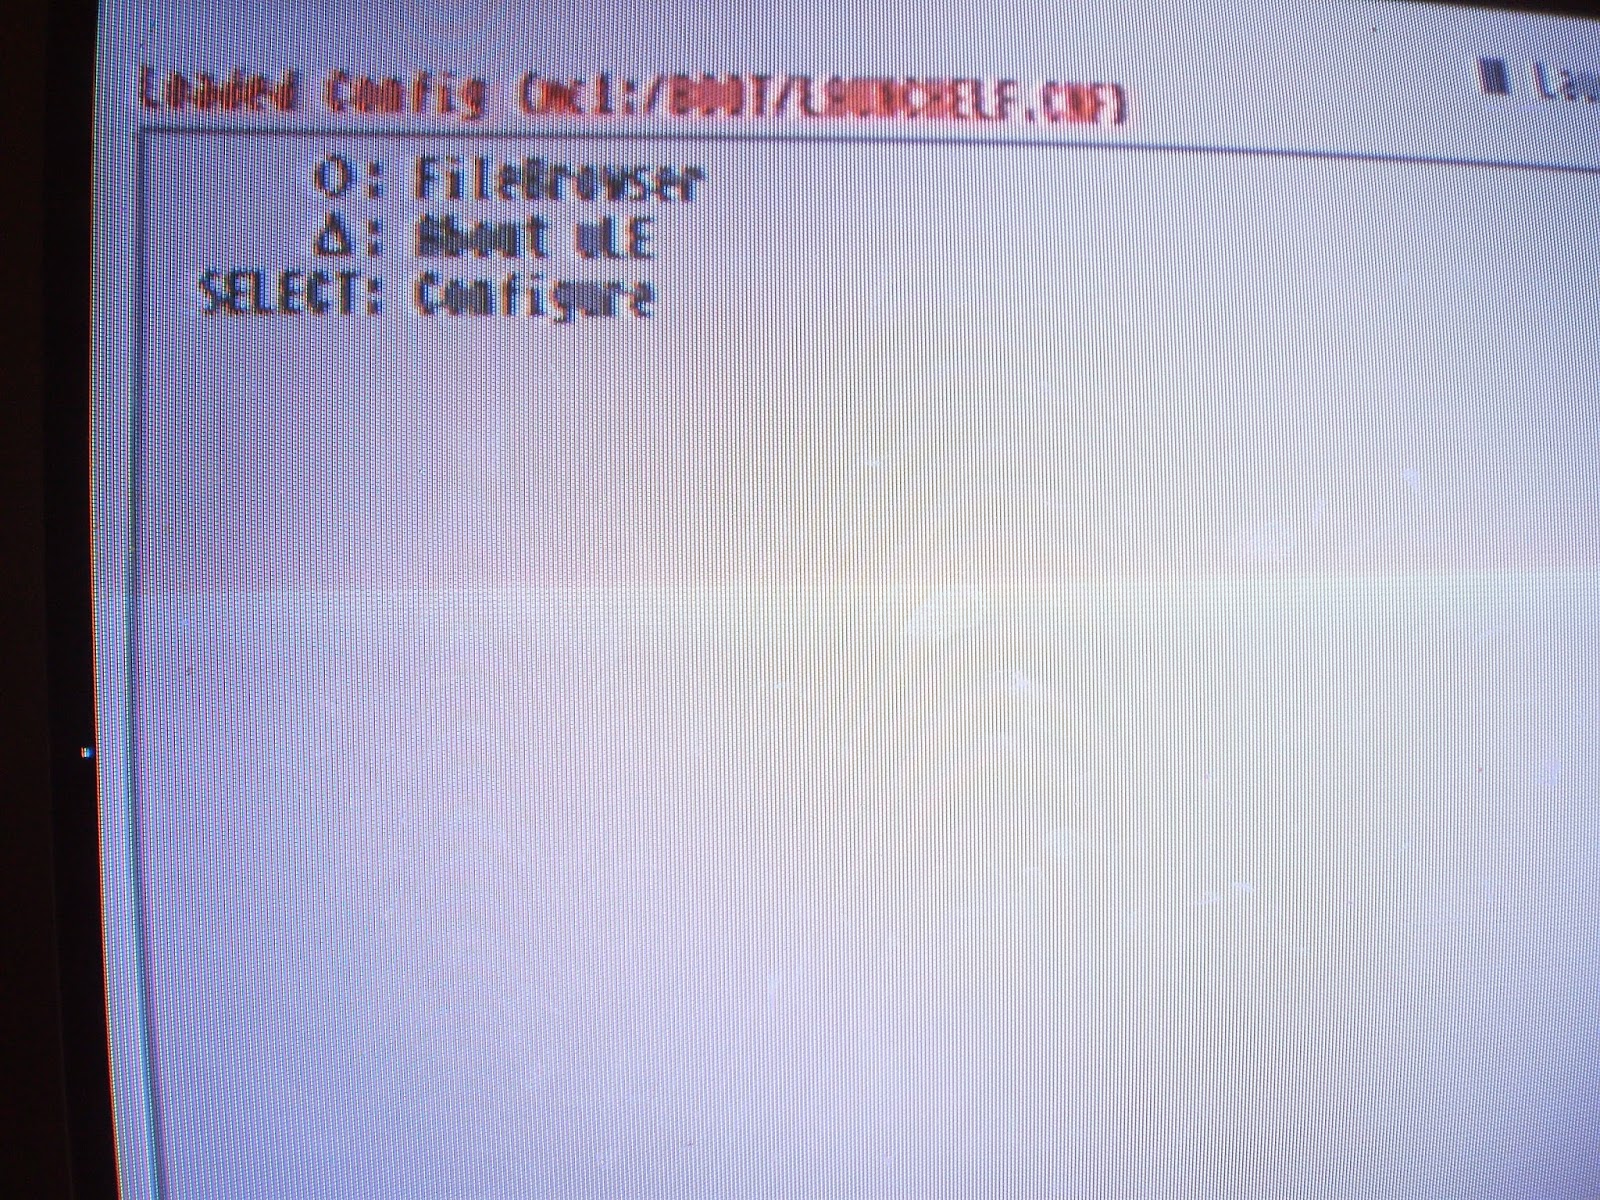
selanjutnya tekan O pada filebrowser gambar di
 atas sebelah kanan..
setelah itu akan masuk ke menu  mass itu tempat di mana flasdis kamu di simpan
cari file BESLES-53702DATA14 yang sudah kamu simpan tadi
setelah itu kamu copy tekan R1 lalu copy ke MC O gambar di bawah ini
NB. ingat ruang data di game MC residen evil kamu harus ada yg kosong


selesai sudah kamu sudah bisa memainkan game resident evil senjata P.R.L 412 yang legendarismantap kan,,, selamat bermain
file downloan save profesional senjata tak habis habis
server 1
file dowloan save file master HDD uaunchelf
server 1

Dec 7, 2011

cara memasang infus canon mp258


Bahasan kali ini adalah tentang Cara Pasang Infus Canon MP258. Printer MP258 ini adalah printer multifungsinya .biasanya pemasangan infus sangat lah mahal
sekisar Rp150~250., tapi tenang aja kita bisa menghmat uang cuman lumayan repot,, hehehehe
tapi tak apalah itung2 belajar ,inget infusan dari ahlinya jg blm tentu hasilnya bagus , saya pernah berulang kali bolak,balik membawa print ke tokonya karna masalah infusan yg bermasalah,,, akhirnya saya kerjakan sendiri alhasil sampai sekaran infusan bermasalah bisa saya tangani sendiri,,, lohhh ko malah curhat,,, hehehehe :D
langsung aja iya,,, cek mode on,.,.,.,

Pertama siapkan bahan seperti di bawah ini.

  1. paku mading/carinex 
  2. tabung infus & knee infus
  3. tissu
  4. double tape tebal
  5. suntikan & penyedot tinta 
carinex bisa km beli di tempat photo copy terdekat
untuk tabung infus,selang tabung,knee,suntikan,penyedot tinta bisa kamu beli di toko print terdekat, tp
untuk penyedot tinda biasa nya tidak di jual,,, yahhh minta aja dah ,, opss klo kamu malu entar ada cara buat
nyedot tinta gratis,,, hehehehe

langkah pertama..

perhatikan gambar di atas
  • lubang paling atas/tengah  warna merah
  • kuning di kanan
  • biru di kiri
kalo kamu tidak yakin ambilah tissu tempelkan pada plat tembaga yg ada di depan catridge
ingat jgn sampai tersentuh tangan catridge bisa rusak
lihat gambar di bawah


selanjutnya adalah melubangi catridge ambil carinex /paku mading untuk melubangi
bila km mempunyai bor tangan bisa kamu gunakan jg yg penting lubang sesuai ukuran
karet knee untuk masuknya selang


bila sudah selesai tinggal pemasangan karet & selang infus nya..
ingat jng sampai selang infus tertekuk,,, sesuaikan panjangya.,,


ingat disini yg paling penting bila km tidak mempunyai penyedot tinta...


kamu bisa memanfaatkan  rumus fisika,,, hehehehe,,,
isi tabung tinta terlebih dahulu lalu letakan di tempat yg lebih tinggi
sebelumnya copot ujung selang yg di dekat catridge biarkan tinta mengalir
ingat jgn sampai tumpah ya,,, klo sudah di ujung langsung aja di masukan lagi
biarkan seperti itu dulu nanti saya tambahkan trik nyedot tinta tahap akhir...
selanjutnya pasang catridge pada print kamu,,


tutup peyekat catridge dan double tape selang infus lingkaran kuning sesuaikan
panjang selang infus supaya tidak tersangkut waktu proses pengeprinan nanti dan tutup print km

lalu letakan sja tabung infus di sebelah kiri tidak usah membolongi body print,,,
ooo iya untuk pembuangan tinta gambar di bawah


kamu tidak perlu membuat pembuangan tinta luar karna penampungan di dalam sudah cukup
luas untuk menampung tinda,,,
bila semua sudah selesai selanjutnya idupkan print masuk ke setingan
ini di lakukan agar tinta bekerja dengan maksimal


selanjutnya ,, jgn lupa pesang kertas terlebih dahulu siapkan beberapa lembar

lakukan proses sampai selesai & berulang2 sampai warna  indikator tidak bergaris hasil print_nan,,
maaf tidak di screensot,,,

pemasangan infus ini memang praktis tapi berdampak kurang baik pada print
bila print kamu jarang di gunakan lebih baik jangan memasang infus tinta
lebih baik menggunakan suntikan biasa,,,
semoga bermanfaat.

Aug 27, 2011

Complete Slackware Netbook Install Guide.

Slackware Netbook Install Guide For this guide I used a HP Mini 210HD Netbook, However this should apply to the majority of the netbooks out on the market right now. I’m assuming you know how to do a console based linux install & know how to partition a drive using fdisk/cfdisk. If not then you may want to read the man pages, Once you boot up the Slackware install type;
man fdisk
man cfdisk
However, I will give some guidance at my suggested partitioning scheme for netbooks.
The installation system was a HP Mini 210HD with the following specs;
Intel Atom N450 (Dualcore x64)
2GB of system RAM
160GB Sata HDD
Intel audio/video (Works out of the box)
Broadcom STA Wireless Chip (Requires configuration)
Synaptics Touchpad (Requires configuration)
Begin by getting a Slackware x86 (CD1) ISO from http://slackware.com/getslack – After that, Head on over to http://unetbootin.sourceforge.net/ and download unetbootin so you can burn the ISO to a USB Stick or a SD Card (The burning process is self explanatory)
Once you have a USB Stick or SD Card with Slackware (CD 1) on it you’re going to reboot your system. Once you’re prompted with the Slackware boot screen, Press TAB to give boot options. Once you’re greeted with the  boot option screen, Append;
-noudev
To the kernel of your choice, I use SMP for my Multiprocessor CPU (You may want to do the same if you run the Atom N450 CPU to take advantage of the second core)
After the boot process is complete you will be greeted with a login prompt, Login as root. Now you want to begin partitioning your drive, Start by typing in;
cfdisk /dev/sda
And then choose your drive layout, My suggested layout for Netbooks is 10gb for / & the rest for /home. I personally run a swapless install, However if you run resource intensive application your going to want swap. And remember to set / bootable!
Then begin the Slackware install by typing;
setup
Then proceed to “ADDSWAP” if you have a swap partition or “TARGET” if your running a swapless install. When installing Slackware on a Netbook I like to choose ReiserFS, ReiserFS is light on system resources and is pretty quick/responsive on my system.
Once your done partitioning your drive, Select Network install (You will need a LAN connection for this, Wireless setup will be after the complete system is installed) and pick the nearest mirror to you (You can find them at http://slackware.com/getslack).
For package series, I use;
a The A (base) package series.
ap The AP (applications) package series.
d The D (development) package series.
e The E (GNU Emacs) package series.
f The F (FAQ/Documentation) package series.
k The K (kernel source) package series.
l The L (libraries) package series.
n The N (networking) package series.
x The X (X Window System) package series.
xap The XAP (X applications) package series.
After that, Select Full for the prompting mode screen. And your system will begin installation. Once that is complete, Continue on through the install. I usually disregard the USB Boot disk and move onto the LILO install. Do a simple lilo install, Unless you need anything special added. Select yes to load the gpm mouse service. Continue on to the network configuration and fill out your network information and select DHCP. Now continue onto Startup Services, For my startup services I only use;
rc.syslog
rc.messagebus
rc.inetd
rc.hald
Then setup your time zone, Select your preferred window manager (I prefer XFCE, It’s lightweight and provides some nice eye candy). Then select your root password. The installation is now complete, Exit back into the console and type;
reboot
When you reboot, Leave your installation media in (USB Drive or SD Card) and startup the Slackware installation again like before with appending;
-noudev
To your kernel choice. And then login as root and type in;
mount /dev/sda1 /mnt
vi /mnt/etc/modprobe.d/blacklist.conf
and add to blacklist;
blacklist ssb
blacklist b43
Save the file and reboot the computer without the (USB Drive or SD Card in) After the system boots up, You should be greeted with a login console. Login as root and then type;
adduser
And then setup your new user information (only use root for system maintenance) After you are done with that, You need to log out of root and login as your user, So type in;
exit
And then log in as your normal user. After your logged in as normal user type in
startx
After xorg starts up may start to notice that your touchpad is acting all funky and the buttons don’t work. This is a easy fix, Start by opening up a terminal window and typing in;
su (and then enter your root password)
echo options psmouse proto=exps > /etc/modprobe.d/psmouse.conf
reboot
After you have rebooted your system, log back in again as your normal user. Now we need to get your wireless up and running. The following is for a Broadcom chip, However you should take the same approach for other chipset using the command below, But with your chipsets driver. For the Broadcom STA chipset head on over to; http://www.broadcom.com/support/802.11/linux_sta.php and download the x86 driver, Once you have it downloaded open up a terminal and;
su
tar -zxvf hybrid-portsrc_x86-32_v5.60.246.6.tar.gz
make clean
make
modprobe lib80211
insmod wl.ko
cp wl.ko /lib/modules/2.6.33.4-smp/kernel/drivers/net/wireless
depmod -a
echo modprobe wl >> /etc/rc.local
Now you need to connect to a wireless network, Keep that terminal window open and now type;
ifconfig eth1 down
iwconfig eth1 essid <essid>
iwconfig eth1 key <key>
ifconfig eth1 up
To speed up the process of connecting to a wireless network you can use my wireless bash script below, Open up a console and type in;
jed home-wifi.sh
And this will open jed, Then you want to type into jed;
#!/bin/bash
insmod /lib/modules/2.6.33.4/kernel/drivers/net/wireless/wl.ko
ifconfig eth1 down
iwconfig eth1 essid <your network name>
iwconfig eth1 key <your network key>
ifconfig eth1 up
dhclient eth1
# end
Now save the file and type;
su
chmod u+x home-wifi.sh
cp home-wifi.sh /usr/bin
Now when you want to connect to your wireless connection all you have to do is;
su home-wifi.sh
You should now have a fully functional Slackware installation. Happy Slacking!

Easiest way to install XP on SD card ... of Flash disk ...


Do you want both system in Eee!? Here is solution ...
1. Dont touch at Linux on main Disk ... only disable it in BIOS ...
2. Now you have "no disk in Eee" ...
3. Take USB Floppy drive (i used from my Dell notebook, that is already USB too) ...
4. If you have no any Floppy drive, make a fake floppy on flashdisk ...
This is step by step ... Thanks previous poster ...
a. Download Physdiskwrite (http://m0n0.ch/wall/physdiskwrite.php)
b. Download Boot disk image: MS Windows XP System Setup Disk (http://freepctech.com/pc/002/files010.shtml)
c: What to do:
  • -On your XP computer, download physdiskwrite and the boot disk image mentioned above. Unzip physdiskwrite to a temp directory. I was able to "unzip" the system setup disk executable using WinRAR as well, to get the actual image file rather than the disk maker. WinRAR throws an error and says that the archive is corrupt, but it gets the image out and it works just the same.
  • So, you should have a temp filder (say c:\temp) with two files: physdiskwrite.exe and WXPBOOT.IMA.
  • -Insert the flash memory device you DO NOT intend to use to hold your XP install files.
    -Open a command line and navigate to your temp directory.
    -Type: physdiskwrite -u winxpboot.ima
  • Type number of your Flash device and is it!
5. If you have a Floppy drive, make there a bootable diskette with WinXP setup disk ...
6. Copy complete WinXP CD to SD card ...
7. Boot your Eee from Floppy (or floppy flash fake drive) - if it works go on ...
8. Insert SD card to Eee and power up system ...
9. Boot with DOS on diskette and run : C:/I386/winnt.exe (it is zour SD card)
10. wait and your windows are already installed!
11. Delete from SD card prevoious loaded content from WinXP CD ...
      Ypu can swith system from BIOS, disable or enable main disc with Linux, or remove SD with Windows

Aug 26, 2011

Install Hard Drive - A guide to installing an IDE hard drive

This guide will take you through the process of installing an IDE hard drive into your PC, step by step with the aid of photos.

To upgrade your hard drive is fairly straightforward and can be done in no time at all.

in this section:
  • What you need for this guide.
  • Upgrading your old hard drive.
  • Installing or adding a new hard drive.
  • finishing the installation

note: If you are just looking for some extra storage for computer, check out our guide to external hard drives
spr
Before you follow this tutorial you must read the terms of our disclaimer.
spr

To install your hard drive you will need:
  • Compatible IDE Hard Drive.
  • 4 securing screws (supplied with hard drive or case).
  • Cross-point (Philips) Screwdriver suitable for your PC case.
  • IDE Cable (if required).
  • Anti-Static Wrist-strap (if available). 

spr  
Upgrading your old hard drive
spr
note: Disconnect the power and remove your PC's cover, see our guide.
spr

 If you are simply replacing your current hard drive with a bigger drive then the process is very straightforward.

It is sometimes easier to remove the IDE cable and the power cable (labeled A and B in fig 1.1) before you remove the fixing screws (see fig 1.1), as sometimes the cables can be stubborn.

Note where the cables go, all IDE hard drives have the same standard socket types and the IDE cable should have an alignment notch to ensure it is inserted the right way (see fig 1.2), likewise the power cable will only plug in one way.

After removing the fixing screws (there are four, two on each side of the chassis), gently take the drive out of the chassis and put it to one side.

Next, take your new drive and ensure that the jumper settings are set to master or single drive (see fig 1.2). The jumper settings should be displayed on the hard drive or in the manufacturer's book.

Now gently slide the drive into position (where the old drive was) and line up the holes, then insert the 4 fixing screws.

Plug the IDE and power cables in (see fig 1.2) and then move onto finishing installation.


 spr  
Installing or adding a new hard drive
spr
note: Disconnect the power and remove your PC's cover, see our guide.


spr

The first thing to do after removing the case covers, is to locate the drive bay where the hard drive will go (see fig 1.3 below). 

 In our example in fig 1.3 above we have a drive already in the bay so you can see more clearly where it should be situated. We don't have a floppy drive installed, but if we did, then it would be located in one of the free bays above the hard drive.

If you are adding a second drive then try and leave a gap between the two drives for ventilation (although this might not always be possible).


spr
back to top | ©
spr

 Jumper Settings

Jumpers are metal pins that have small black plastic sleeves that slide over the top of them, they are used to configure certain devices, including hard drives.

For the location of the jumper selector see fig 1.5, the jumper settings should be displayed on the hard drive label or in the manufacturer's book.

Single Drive - If this is your only hard drive then set the jumper selector to master

Two Drives - if the new drive will be the main drive, set the jumper to master, if you want it as a secondary drive then set it to slave. Alternatively, you could use a separate IDE cable on the motherboard's secondary IDE interface (see motherboard manual).

Once you have set the jumper, gently slide the drive into the drive bay, line up the holes (2 on each side of the drive bay) and insert the 4 fixing screws (should have been supplied with your case).

The next step is to attach the IDE and power cables.

In fig 1.4 below you can see a standard IDE Cable, note there are 3 connections (also notice the difference in distance between the connectors). Connection A plugs into the motherboard and then the slave and master connections are used for IDE devices such as hard drives. If you are only installing one drive, or the new drive is to be the master, then use the master connector, if the drive is to be the slave then use the slave connector.

 The IDE cable will be marked down one side with a red or black strip, this denotes Pin 1, match this with the Pin 1 indicator on the back of the hard drive

The power cable can be found attached to your computers case's power supply, you can see an example below in fig 1.5 


 Plug the IDE and power cables in (see fig 1.5) and then move onto finishing installation.
spr
back to top | ©
spr


Finishing Installation

Double check all connections and make sure the device is set correctly as master or slave, also make sure you haven't loosened any connections while you have been installing.

You may wish to make sure the hard drive is correctly installed before replacing the covers, but it is advisable to replace the covers before reconnecting the mains.

When you reboot your machine the bios should automatically detect the new hard drive, then when your operating system (windows or other) has loaded, go to My Computer (or similar) and you should see your new drive there. The letter assigned to the drive will depend on your machine's configuration.

If the drive you have just installed is the only drive, then you will need to install an operating system (if none present).
spr


How to Keep Raccoons Out of a Trash Can

Though trash is trash to us, it can be a meal or two for some curious and hungry wild animals. Notorious for making a snack of whatever you've thrown out in your trash can, raccoons will stop at very little to get their treats out of your trash.


What can you do to deter these cute but curious creatures from strewing your refuse all over your lawn? Fortunately, there are several options you can choose from. Read over the suggested steps below to find a number of easy options for keeping raccoons out of your trash can.


  1
Focus on the trash can
 itself. Focus on the trash can itself. Your first best defense is to ensure that the trash can itself is as impenetrable as a fortress to a raccoon. Purchase a metal trash can with a lid that locks in place.
  • Note that some plastic trash cans have a screw that secures the lid on the can. However, be aware that raccoons can and do chew through plastic bins.[1]
  • If you're not sure what bin to choose, ask a knowledgeable salesperson to help you – be sure to mention that it must be raccoon-proof. Also, special commercial raccoon locks for bins can be bought.
  • Never leave your trash can exposed by leaving the lid off! That is an invitation to foraging.
 2                          
                                            
Secure the trash can lid with clamps or the locking system already fitted on it.

  • Secure the trash can lid with clamps or the locking system already fitted on it. Alternatively,   you can use a chain and lock – raccoons aren't smart enough (yet) to pick a lock! 
                                             
For a lid that doesn't lock in place, attach plastic hose pipe or tubing all around the edge of the lid so that it creates a seal when fitted onto the bin.
  •  For a lid that doesn't lock in place, attach plastic hose pipe or tubing all around the edge of the lid so that it creates a seal when fitted onto the bin. Cut a piece of rubber tubing or hose pipe along one side and slip it over the rim of your trash can. This will create a tight seal for the lid and make it difficult for raccoons to pry off.[2]     

                                          
Set a rock, cinderblock or other heavy item on top of the trash can.
                                
  •  Tie the lid of your trash can to the can with a rope or bungee cord secured around the handles. Wrapping the bungee cord all the way around the bin on two sides will put off the most intrepid raccoons.[3]
3
Set a rock, cinderblock or other heavy item on top of the trash can.
Set a rock, cinderblock or other heavy item on top of the trash can. The only problem with this method is the heaviness of the item. If members of the household have trouble lifting it up, they're likely to stop taking out the garbage, so bear this in mind and only use this method if those who use the trash can are still able to get to the trash can easily.

 4
Spray the interior of the trash can with ammonia.
 Spray the interior of the trash can with ammonia. Alternatively, place ammonia-soaked cloths inside the trash can or pour ammonia in neat.[4] Ammonia smells like urine to a raccoon, making it highly offensive to them.[5] You can also spray other areas where raccoons seem to congregate, to discourage them from entering your yard in the first place.

 5
Sprinkle a raccoon repellent around your trash cans.
Sprinkle a raccoon repellent around your trash cans. Raccoons will not like the taste of almost any type of commercial repellent product.


  • If you do not wish to use repellent granules, you can use hot pepper or cayenne pepper instead.
  • Other suitable repellents include oil of mustard and naphtha flakes.[6] Note that the use of naphtha flakes, naphthalene mothballs, etc. may be illegal in your area as they are possible carcinogens; check local regulations. 
6
Install motion-detection lighting around the area where you keep your trash cans.
Install motion-detection lighting around the area where you keep your trash cans. Raccoons prefer darkness and might be deterred by a sudden bright light. A 100 watt bulb is a good choice for the lighting level.

If possible, place a radio near your trash can. Set it to an all-news or talk station. The sound of human voices might deter raccoons from coming near your trash cans.[8] [9] You can use a low level volume and gradually increase it if needed.

 7
Place your trash cans in a secured bin area or other enclosure, such as inside a shed, basement or garage.
 Place your trash cans in a secured bin area or other enclosure, such as inside a shed, basement or garage. If no animal can get in without a human opening a door, then the trash cans will be left undisturbed.

DAFTAR ISI